
Vintage style heart tin features layered rim,
dimensional finger-ring handle with brad punch,
multiple segmented tin sides
with "fluted" overlay accents.
Heart can be used alone as a
container.
For pin cushion variation, prepare the heart insert
with triangle interior
brace, fill with fiberfill stuffing,
then glue wool felt cover
in place and insert into tin.
Embellish cover with embroidered vine, leaves &
berries pattern provided as part of the file
(felt cut shape with tiny punch
circles &stitching guide
to transfer with pencil dots,
also non-cut design
diagram for reference).
Tin measures approx. 6.25" long (incl. handle)
x
4.5" wide x 1" deep.
(This tutorial is under construction.
Please return soon to view the completed assembly guide.)
ASSEMBLY: 1. Identify and cut the shapes:
A heart tin base B rim #1
C boxing (side wall) strips L & R
D rim build up (3)
E under rim (cover for assembly tabs)
F interior base cover (optional for non-pin cushion)
G loop handle with accent rectangles
"Fluting" outer accents: H long sections;
I pair sections; J single sections
K cushion insert base
L cushion insert boxing (side wall) strips
M cushion insert template & stitching guide
N printed stitching visual guide
O wool felt cut shape with embroidered detail
NOT SHOWN: cushion insert interior reinforcement strip
 2. Prepare the tin side walls by bending the bottom
(notched) tabs inward, top straight sided tabs outward.
NOTE the small symbols in end tabs or near ends
that help identify which tabs and which ends
should be attached.

 3. Join the left and right wall strips by overlapping
the straight edge of one end behind the
corresponding tab to the perforation line,
and gluing in place.
 4. Complete the bottom center seam
in similar fashion.


 8. Identify the rim #1 shape by locating the
"1" symbol cut into the shape near top.


 10. Position rim build up assembly
over the #1 rim, align as precisely as possible,
and glue in place.


 Attach the pair accent to overlap two panels
next to the large sections, and continue
until there is only a single panel at center top,
along both sides.


 . . . as can be seen here.


 21. Prepare the interior reinforcement strip
by bending into shape as shown here, with end
tabs outward, and center tab perpendicular.


 . . . using a flat bladed tool such as this spatula
to ease in the felt edges.
(This is a snug fit.)


ASSEMBLY: 1. Identify and cut the shapes:
A heart tin base B rim #1
C boxing (side wall) strips L & R
D rim build up (3)
E under rim (cover for assembly tabs)
F interior base cover (optional for non-pin cushion)
G loop handle with accent rectangles
"Fluting" outer accents: H long sections;
I pair sections; J single sections
K cushion insert base
L cushion insert boxing (side wall) strips
M cushion insert template & stitching guide
N printed stitching visual guide
O wool felt cut shape with embroidered detail
NOT SHOWN: cushion insert interior reinforcement strip

(notched) tabs inward, top straight sided tabs outward.
NOTE the small symbols in end tabs or near ends
that help identify which tabs and which ends
should be attached.

Here you can see the bottom and top tabs
bent inward and outward, as well as the
tiny circle symbol cut in the bottom tab
near center front seam.

the straight edge of one end behind the
corresponding tab to the perforation line,
and gluing in place.

in similar fashion.

6. Adjust the heart walls shape to roughly match up
with the base shape, then position the
base shape face side outward over the
bottom tabs. Begin with the bottom center tab
to position and attach it to the corresponding
straight edge at the center bottom of heart base,
with tab perf line at base edge.

7. Line up, join and attach the boxing tabs
on each side of center at top to
corresponding straight edges of heart base.
Apply glue, adjust boxing strip tabs to match up
with straight edges of base, and attach in place
until all edges are joined all around.

"1" symbol cut into the shape near top.

Apply glue to the upper wall tabs (or a portion),
then position the #1 rim over the tabs.
Attach bottom tab, then top pair of tabs
as with the base, then work around to adjust
and attach each tab perf line to corresponding
inner edge of rim.

Apply finger pressure (and adjust as necessary)
so that rim inner edge is attached as accurately
as possible.

To help the tab-to-rim seam attach securely,
place the tin assembly face down on flat surface
and apply pressure at the tabs backsides
all around.

9. Prepare the rim build up by layering and
attaching the three rim shapes, taking care
to line up all cut edges and brad punch hole
as precisely as possible.
If available, flatten with weights during the
glue drying process to prevent warping.

over the #1 rim, align as precisely as possible,
and glue in place.

11. Working from tin bottom,
slide the under rim (marked with a divided 'U'
over the bottom of the tin with
face side down. Apply glue, slide up
fully into position, and attach to hide tab
construction.

12. Prepare the pair "fluting" accent shapes
by bending back slightly at center perforation shape.
Position and attach long section to
corresponding long wall segments.

Position the single accent shapes at panels
near bottom point (point panel remains blank),
and as the last accents added near center top.

next to the large sections, and continue
until there is only a single panel at center top,
along both sides.

13. Prepare handle shape by bending end
bracket heads upward slightly (at the second
perf line in from each end),
and bending perf lines between back slightly.
14. Position and attach corresponding shaped
accents to each handle panel.

15. Form a loop to bring the backsides of
the end brackets together, align edges and
punch holes, and glue in place.

16. Apply glue, position top bracket under
the bottom of the rim assembly with holes aligned,
and glue in place.
Add a regular sized brad accent at punch hole.

17. If planning to use the heart tin without the
pin cushion insert, position and attach the
interior cover shape inside the tin to hide the
tab construction.
NOTE that you can tell the "cover" shape from
the tin "base" shape by the small irregular
semi circular cutout on left edge near bottom.

18. Prepare the cushion insert boxing strips
in similar fashion to the tin, bending bottom
tabs inward . . .


19. Join strips at center top . . .

. . .and bottom seams
in similar fashion to tin.
20. Position, adjust and attach insert base
in similar fashion to tin.

by bending into shape as shown here, with end
tabs outward, and center tab perpendicular.

22. Position reinforcement shape so that
triangle side angles fit into the top perf line
of long wall segment, with tabs fitting against
each side of the top center angle.
Glue all three tabs in place.

23. Position the felt cover heart template over
the wool, trace edge . . .

. . .and use tip of mechanical
(or equivalent sharp point) pencil inserted into
each cut hole to transfer stitch markings to
wool face.
Cut out heart on outer traced line.
(Here you can see pencil markings.)

24. Follow the line diagram of the embroidery pattern
when adding embroidery stitches to the wool felt
following pencil markings.
Find illustrations for embroidery stitches
HERE.
NOTE: use 3 ply floss to complete
1) small straight back stitches
fill in between each dot on the vine lines;
2) lazy daisy stitches extend where long
cut lines are shown on the template;
6 ply floss to complete
3) berry stitches are added at dots
using french knots or colonial knots.

25. Use the finest darning needle you are able
to get suggested pliess of floss through
to complete the stitching.
Transferred dots are the insertion points
for each back stitch down and up.

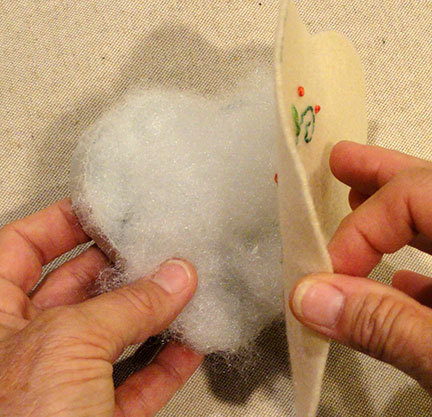
26. Fill (over fill) compartments of insert tray
with fiberfill.
Use quick-grab adhesive to hold in place.
Then cover the whole heart tray with
more to make sure there is an abundance
of fill. When the cover is put on and pulled
snug into place, some of the "dome" of fill
will compress.

27. Center the felt embroidered cover over the
heart assembly . . .
. . . pull the edges downward into position
(NOTE that the cut edges of felt cover should
more or less line up with the bottom of the walls).
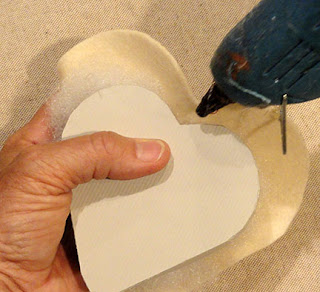
28. Apply a dab of quick grab glue (hot glue shown)
at the top center of insert wall, then "tack" attach that spot.

Apply glue and "tack" at center bottom point . . .

. . . then midway along each side.

29. Next, apply glue along walls in between the
"tack" spots, then ease in the fullness between
as evenly as possible, continuing to match
felt cut edge to bottom of wall edge.
A series of "darts" or "tucks" will be created.

Here is the prepared insert to this stage.

30. Use sharp sewing shears to trim away
the excess at each "dart", taking care
not to allow the cuts to extend any closer to
the top wall edge (beneath the felt, of course)
than 1/4"

Also trim any overhang even
with the insert's base.

31. Apply glue to the inside bottom of the tin,
also low along the interior walls.
Position and slide the insert cushion
into the tin . . .

to ease in the felt edges.
(This is a snug fit.)

Here is the completed heart tin pin cushion.

Wow!
ReplyDeleteHugsThe LookBook